Getting Started
Account Setup
To get an account on EnOcean SmartStudio please contact EnOcean Sales
Once an account is created you will receive login information to access the EnOcean SmartStudio Interface for managing devices, gateways and adding integrations. For new users of EnOcean SmartStudio, it is recommended to follow below Quick Start Guide.
Quick Start Guide
This guide will walk you through the steps to add an EnOcean STM 550 to EnOcean SmartStudio using the HPE Aruba Network, and how to view the device data.
Step 1: Enter Topology
Before adding devices, you must first configure the building topology that represents where the devices will be installed. The topology follows a hierarchical structure:
World → Site → Building → Floor → Room
This structure allows you to define multiple sites (such as cities or campuses) and multiple buildings within each site. To create the topology:
-
In the Topology section, hover over World and select Add Child.
-
Enter a name for the site, then select Create.
-
Continue building the topology by selecting Add Child on the newly created site to add a Building.
-
Repeat this process to add Floors and Rooms as needed.
Step 2: Adding STM 550 to EnOcean SmartStudio
The following steps guide you through adding an STM 550 device to SmartStudio.
-
Navigate to the Devices section and click Add Device.
-
Scan the QR code being shown in SmartStudio to complete the commissioning on your phone.
On Your Phone
-
Select the desired location and tap Next.
-
Allow the app to access your camera, then scan the QR code on the device.
-
Change the device name if desired.
-
To add additional devices to the same location, tap the QR icon and scan the next device.
-
Tap Save to add the device(s) to SmartStudio.
Note: On some phones, you may need to adjust camera settings.
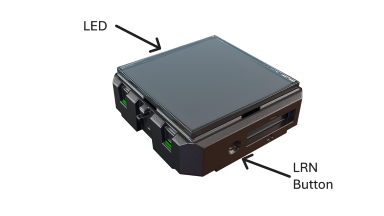
Step 3: Activating the STM 550
The STM 550 is delivered in flight mode. To activate the device, press the LRN button (see picture below) using the following sequence:
-
Single press the LRN button, and the LED blinks green two times.
-
Wait a few seconds.
-
Triple press the LRN button, and the LED blinks green three times.
Note: Before using the device, ensure it is adequately charged by placing it under ambient lighting for few minutes.
Step 4: Configuring the HPE Aruba Network
Configure your HPE Aruba Network to forward STM 550 data to EnOcean SmartStudio. The configuration process depends on your Aruba network setup:
Step 5: Verify Connectivity
In SmartStudio, you can verify the device connectivity:
-
Navigate to the Devices section to see the list of added devices.
-
Verify the device Status is either yellow or green, based on below description.
-
Check the Last Seen time to see when the last telegram was received.
Under Device Status, a colored indicator shows the device activity
| Status | Description |
|---|---|
| Green | Indicates that the reporting interval has been successfully calculated and the device is online and reporting according to its configured interval. |
| Yellow | Indicates that activity has been received and the platform is calculating the reporting interval after collecting a sufficient number of telegrams. |
| Red | Indicates that no activity has been received from the device. |
Step 6: Viewing Data on the MQTT Interface (Optional)
You can now connect to the MQTT interface to monitor data from the STM 550.
-
Download and install MQTT Explorer.
-
Navigate to the Integrations section and select MQTT Client.
-
Copy Username, Password, and Broker URL needed to setup the connection.
-
Use these credentials to connect to the EnOcean SmartStudio MQTT interface in MQTT Explorer.
-
Subscribe to the relevant topics like
<your-MQTT-username>/#.
For more information about MQTT integration, please refer to the MQTT documentation.